Menu

Friday, December 5, 2014

Get that Vampy Lip Look: Burgundy Lip Trend Tutorial.

Guys. It's my first tutorial. I'm super stoked.

I worked really hard to cut down all the video I had to just under 15 minutes for you. As you're watching, you will notice that I sped up some parts. Sometimes during those parts, it looks like I am talking. I am in fact talking, but I'm not saying anything overly important, so don't feel as if you are missing anything crucial. 

This may not be the look for everyone, but I love a bold lip. And the eyes are so simple that anyone might want to watch at least the first 10 minutes. I'll list all the products I used below the video. 


Eyes.
Wet 'n' Wild's "Take on the Day" Eyeshadow Primer from the Fergie Collection
NYX's Love in Paris Palette in "Je Ne Sais Quoi"
     You just need a light, shimmery taupe, a warm medium brown, and a cool, really dark             charcoal.
NYX's Love in Paris Palette in "Mon Cherie"
     You need a dark, cool brown. Mine had some sparkle, but that isn't necessary. And a                shimmery vanilla. Or a not shimmery vanilla. You decide.
L'Oreal's Voluminous Butterfly Mascara in "Blackest Black"
Brows.
A mixture of shadows from e.l.f.'s 96-Piece Geometric Palette
Lips.
NYX's Slim Lip Pencil in "Currant"
Revlon's Super Lustrous Lipstick in "Black Cherry"
Face.
Revlon's Colorstay Foundation for Normal/Dry Skin in "Ivory"
Hard Candy's Lite Brite Undereye Concealer and Highlighter in "Fair" 
Revlon's Photoready Eye Primer + Brightener in 003
A mixture of eyeshadows from e.l.f.'s 80-Piece Day-to-Night Palette for my Contour
e.l.f.'s Studio Blush in "Mellow Mauve"
e.l.f.'s Studio Translucent Mattifying Powder

This is exciting. Thanks for stopping by.

Monday, December 1, 2014

Can You Believe It's Manicure Monday?!?!

Because I can't.

It's been far too long. Far, far too long. But not without good reason. I have been really really busy getting engaged. And working through all of everything that comes with being engaged.

I love these picture update moments, so here we go...

Zach and I have been together for close to seven years. This is a picture of us going to his prom when he was a junior in high school and I was a freshman. We grew up going to the same church with our families and started growing as friends earlier that school year. I had had a pretty consistent crush on him since I was...12, maybe? so those early convos on AIM were pretty much dreams come true.

We started dating when I turned 16 and spent the rest of Zach's time in high school together.

Zach graduated and headed to college in Virginia and I finished my last year of high school. We were already planning to be with each other for a while. so we just kind of let long distance happen. 

I went to school in New York. Zach visited me my sophomore year and my friend Ashton took some pictures for us. Some people were suspicious and thought they might have been engagement photos, but we weren't planning to get married until we both had graduated, so there was no reason to rush things.


And then Zach did propose to me. For real. I knew we were going to get married, but I had no idea he was going to ask me when he did. Happiest October 4th of my life yet.

He brought all the letters I have written him and all the cards I have made and laid them out in a path to him. And then he started to read me something from a letter I wrote him as he was leaving for college. I couldn't handle myself for a moment.

Being proposed to was genuinely one of the most joyful and exhilarating experiences of my life. If getting married is important to you, I sincerely hope you get to experience a proposal (from either side :)). And another huge thank you to all our friends who helped with the planning and executing...of the plan.
In case you aren't tired of pictures yet, I'll just share a few more from our inevitable engagement session. Once again, with the fantabulous Ashton. 
I feel like this one just screams "Christmas Card." Am I right?


Oh, and Zach has a puppy. So I also have a puppy.

For anyone who plans on getting some pictures taken for any reason but isn't sure about finding a photographer or being able to afford one, I'd like to just take some time to share what I worked out for these photos. I found a friend who likes to take photos. My fiance happens to have a nice camera, but even if he didn't we still would have gotten some perfectly fine shots with a basic digital. Then I used PicMonkey, which is a free online photo editing website. I just tweaked the pictures til I liked the way they looked, and they save in really high quality. Money saved. Check it out here

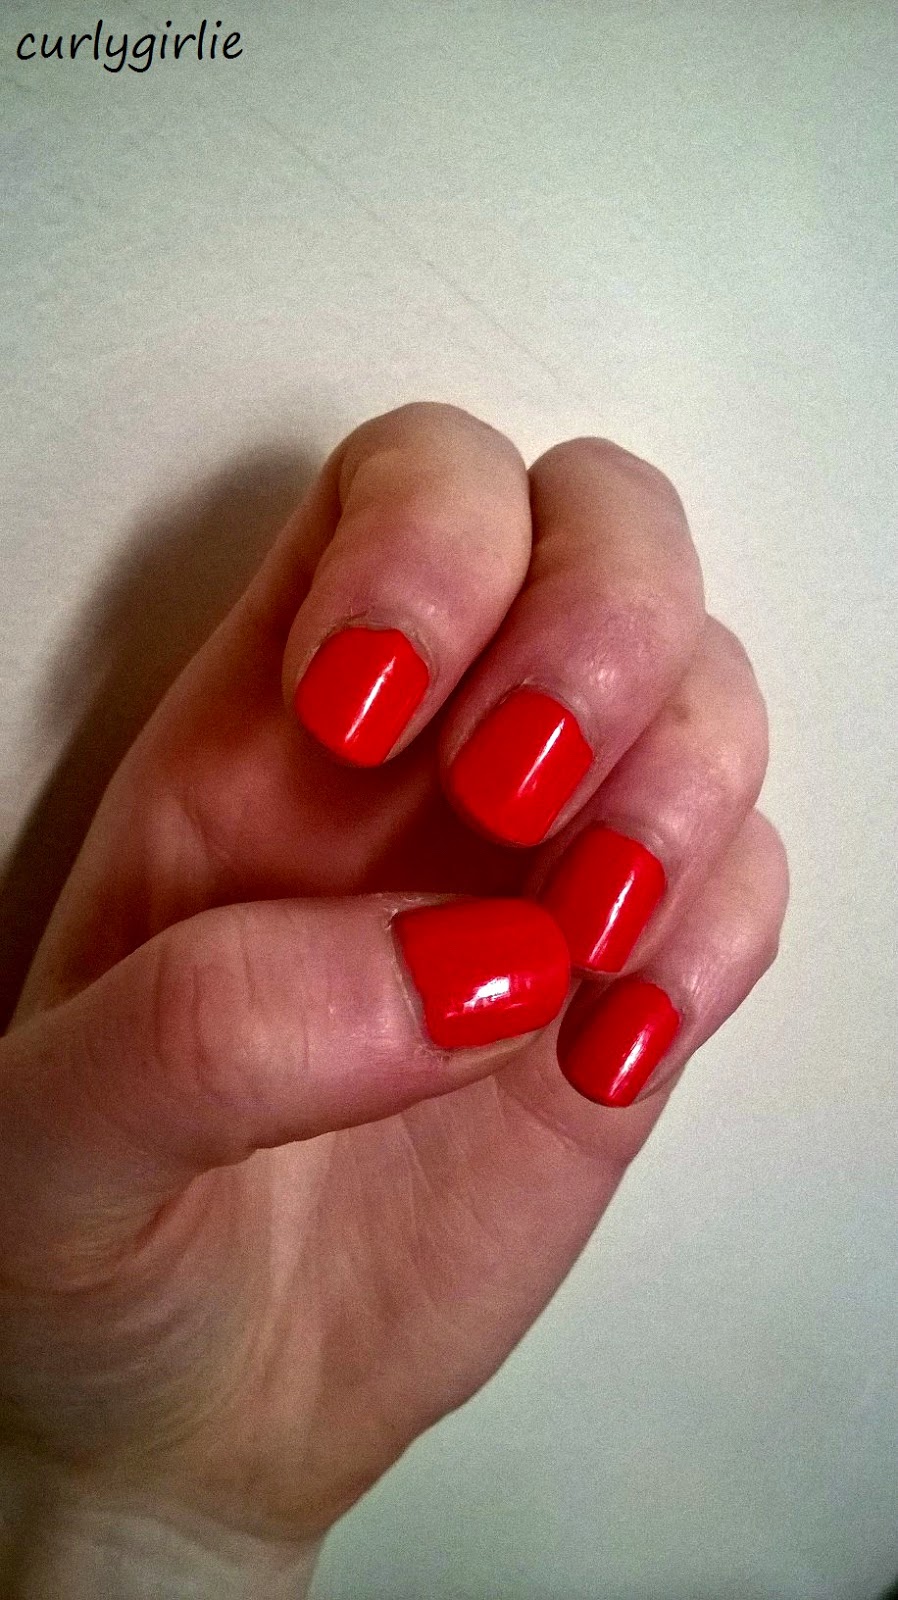
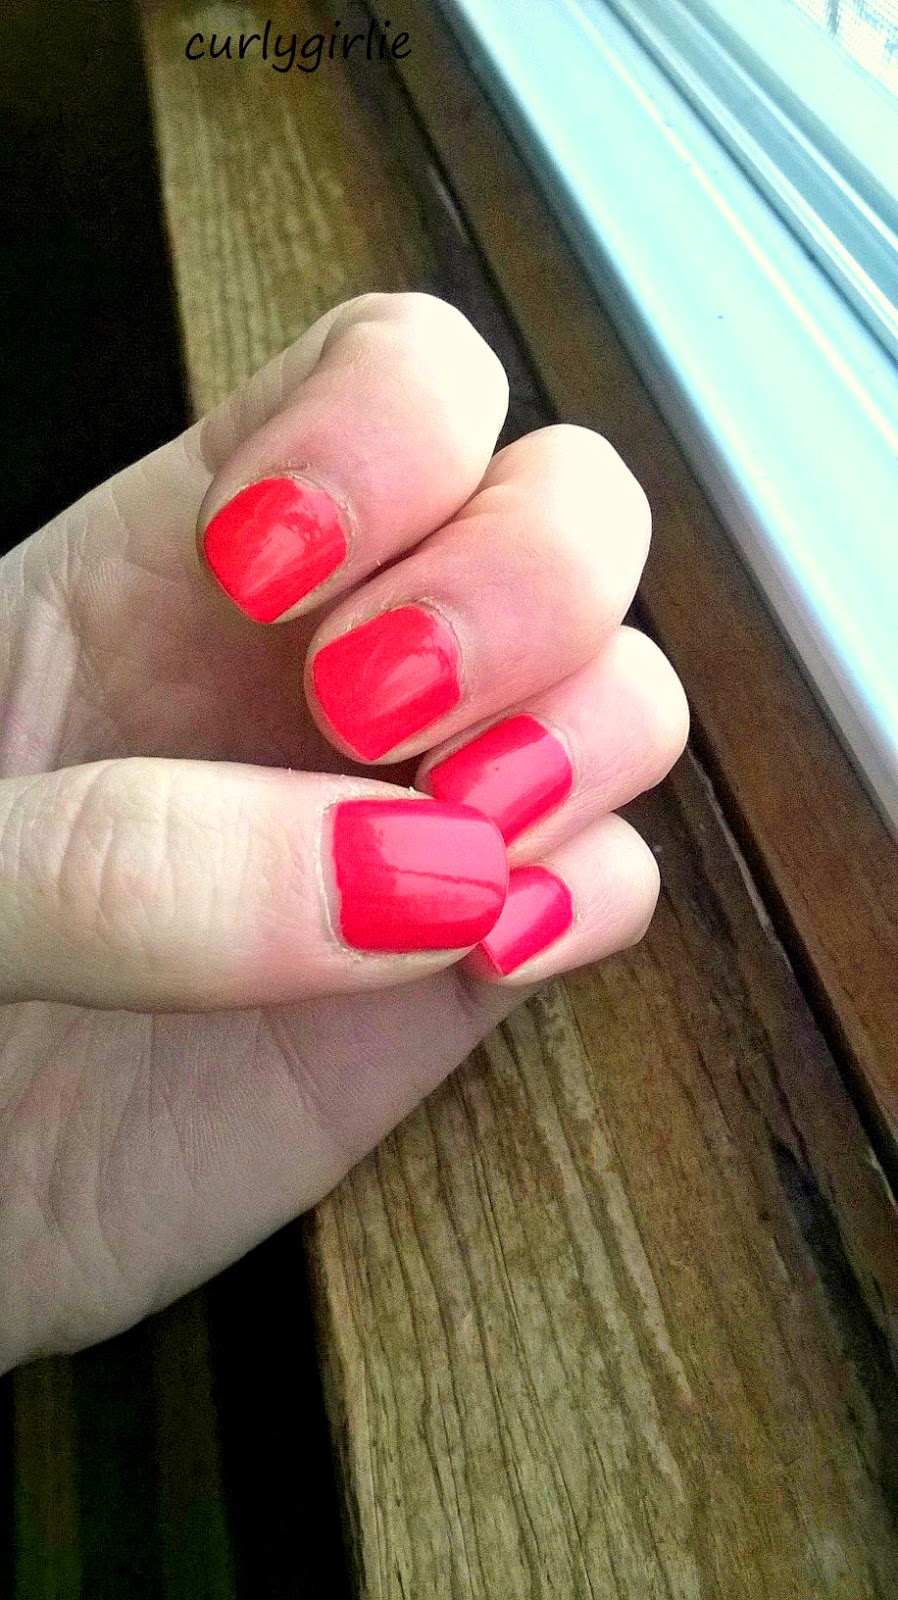
Now for the manicure. Can I just say that I am also fantastically excited about the nail polish I am about to show you? It is most definitely a new favorite color, and I was more than impressed with the virtual lack of chipping. 

Meet Revlon's "Fearless."


The lighting never seemed to be ideal, so I don't necessarily have a fantastic picture of this polish in action. Here is a shot in natural, but very cloudy, light.


This is really not a normal color for me. I tend to stay away from reds in general; I just don't usually love how either average or bold or bloodthirsty they look. But this caught my eye the last time I was in Wal-Mart and I took a little risk on it. Turns out it is going to be one of my all time favorites. It applied nicely; two coats and I had the opacity I wanted. It's a really bright, clean, orangey red. Not necessarily the first color I think of for the winter months, but I l-o-v-e-d the way it looked with some of my cheetah print accents and gold jewelry, and it really just gave me a nice pop of brightness in the middle of the snow and rain and grey. If I ever get a picture that does it justice you will be the first to see it. 

As usual I used Orly's Bonder Basecoat and Polishield Top Coat. This polish wore for a good week with only some shrinkage from the topcoat. No real chipping to speak of. Awesome. 

Thank you oh-so-much for stopping by. I'm going to get caught up with some fall posts and then all the winter-themed thoughts in my head are coming your way. 

Friday, September 26, 2014

Fall Nail Polish Picks.


Since the official first day of fall was only a few days ago, it's a convenient time to talk about fall nail polish shades. One of my favorite things to change (and probably the only one I change at least somewhat consciously) with the seasons is my polish. Believe me, I'm not one for color rules and choosing something simply because it's "in season," but a lot of the tones and shades we associate with fall are just gorgeous and a fun way for me to mix things up. I don't normally go for jewel-tones and warm shades on my nails, but the crisp air and leaves falling remind me of what's in my nail polish box that I haven't reached for in a while. Oh, that's another thing; I challenged myself to go through polish I already own and come out with a loosely comprehensive fall shade repertoire that helps you decide what you might want to try while also sharing personal favorites. Turns out that I do actually like most of the nail polish colors that I own, not just the light pinks and glitters...

Let's get cracking.

Jewel Tones.
In my opinion, jewel tones fit best with the season of fall. They are a pretty constant element of the fall color palette, that is to say, no matter what might be in style for a particular year, jewel tones are always a completely acceptable choice if you'd like to coordinate with the season. Here are two of my favorites in this category:


Revlon's "Fashionista"
A gor-ge-ous teal shade with a smooth 'n' creamy finish. Two coats of this beaut will suffice for an easy and colorful fall manicure.
Want to try it out for yourself? This polish is readily available in stores like Wal-Mart, Target, drugstores, and online.

L'Oreal's "Violet Vixen"
The perfect deep pink for the fall season. It applies smoothly and with an opaque finish. This is on my soon-to-be-used polish list, so expect a Manicure Monday to feature this pretty little thing sometime soon :) 
This polish is probably also available anywhere drugstore brands are sold, including online. I bought mine on clearance at a Dollar General.
Jewel tones also include deep but bright greens, blues, and even some orangey-gold shades. Don't forget to try mixing and matching these fall colors with neutrals or each other for varied and complementary nail looks.

Bronze Shimmers. Gold Shimmers. Brown-ish Shimmers.

Glitter works in every season. That being said, fall is the perfect time to sport those deeper, neutral-toned glitters and shimmers. There is such a variety of these types of shades from brands at every price range. I also think that most bronze and gold polishes look great on every skin tone. Here are two of my favorites from my collection:


Orly's "Ingenue"
This is one of my absolute favorite polishes from one of my absolute favorite brands. "Ingenue" is described on Orly's website as a "purple/gold duo chrome shimmer." On your nails in natural light it has some very bronzey-goldsey-almost orangesey tones. I will definitely be wearing this polish as the season goes on, so stick around to see it in action. 
I grabbed this polish from a Sally Beauty Supply. You can also get it online from www.orlybeauty.com. Click here to go directly to this polish's page.

Jesse's Girl's "Riff Raff"
This is a great option if you are looking for a deeper color that also has some shimmer to it. I find this shade particularly interesting because it just really really brown. The shimmer running through it is pretty bronzey, and while it won't show up like glitter, it does create a very metallic finish.
You can get Jesse's Girl Products at Rite-Aid drugstores and at www.jessesgirlcosmetics.com. Here is a direct link to the nail polish page. Sorry about that silly shadow in the corner...
I'm pretty excited to try layering "Ingenue" over "Violet Vixen." I think the pinks and purples in the two shades will just POP. 

Deeper, Darker Neutrals.

We are hitting the point in this list where colors will start to over lap in some categories, so take the examples as you will. 

Fall is the time to bring out those deeper brown and nude shades. Arguably, neutrals work for every season, but I like to limit my pale pink consumption as the weather gets colder. Although I can never fully cut myself off...


Wet 'n' Wild's "Wet Cement"
This polish is from the Megalast line of polishes from Wet 'n' Wild. With a good base and top coat, these are some of my longest-wearing and best-applying polishes. "Wet Cement" is a great all-year-round color, and it's the type of taupey nude that started being a major thing about, oh, a year or so ago.
I have found that the widest variety of Megalast colors is available at Dollar General. But you can probably find this particular shade at many drugstores, Wal-Mart, and dollar stores. 

Revlon's "Foxy"
This is one of my favorite dark browns. It's got some purple tones to it and applies like a dream. Check out this Manicure Monday to see it on my nails :)
Even though the sunlight shows some reflective pieces in the polish, it doesn't really have much shimmer in its application. That's why I included in the neutrals section. You can find this lovely shade at drugstores, Wal-Mart, Target, and online.

Coastal Scents's "Meteorite"
This polish was part of Coastal Scents COAT Collection. Which has unfortunately, I believe, been eliminated from the Coastal Scents inventory. This is sad because the polishes were actually very good little guys. I wanted to include it anyway because it is a very dark brown and I think fall is the perfect time to get out those super dark browns.
Almost there, guys. You can always just look at the pictures...

Deep, Warm-toned Purples. Like Purples with Red in Them.

Any purple that has a lot of red in it (or read that has some purple) is a great choice for the fall season. Cranberry, oxblood, and burgundy shades were HUGE last year, but I'm saving my pick for that category until my winter shades post. Here are some purples to try out:


e.l.f.'s "Party Purple"
This shades comes out on the nail a bit more red than it looks in the bottle. The shimmer in it just seals the deal and two coats gives a flawless, warm purple finish. This is another one on my soon-to-be-used list. 
Click here to see where you can buy this polish.

Nicole by OPI's "Shoot for the Maroon"
Final color! This lovely is a deep cranberry-purple base with lots of gold and bronze shimmer running through it. It's beautiful, and applies very easily. Unfortunately, the image just doesn't quite do it justice. 
I purchased this polish a pretty good while ago. So I think your best bet if you want to try it for yourself is to get it online. You can find it here.

You are all champions. Thanks for visiting, and stay tuned to see some of these polishes featured in upcoming Manicure Mondays!

Wednesday, September 24, 2014

Outfit of the Day: Meet Moeun!

I think it's important for me to share outfits inspired by all different personal styles, not just my own. We're all different and we all feel comfortable in different things, so why not explore our differences together? One way I'd like to do so: introduce you to my friends and what they like to wear. 

Meet Moeun. She is Korean but grew up in Africa and now goes to college in America. She loves to travel, wear the color black, go antiquing, and talk about Beyonce. She shared this outfit with me and now I'm sharing it with you. I love that this look is made up of pieces from all different places, both conventional retail and secondhand situations. I also love that it involves creative layering, which is perfect for the transition into fall.

Also, she's a lot better at taking this kind of picture than I am.

Here is what she's wearing (in her own words):
Sweater - H&M
White Button Down - Old Navy (borrowed from a friend)
Dress (yes, it's a dress not a skirt.... Sometimes you just gotta get creative!) - street market in      London
Boots - Forever21
Jewelry - H&M; flea market in Senegal

This outfit inspired me to do some layering of my own. Hopefully I'll get those pictures to you sometime soon.

Thanks for visiting, and make sure you say thank you to Moeun for sharing :). Have a happy Wednesday.

Monday, September 22, 2014

Manicure Monday! Featuring Revlon's "Foxy"

I'm not happy about it, but it is time to accept the fact that fall is here to stay. I will certainly miss sunbathing, swimming, and tank tops, but now it is time for chunky sweaters, boots, and hot drinks from the coffee shop. Truthfully, I do look forward to fall styles, trends, and colors, I just don't like being cold as much as I adore being warm. But those chunky sweaters do help soften the blow ;).

I've got something of a fall nail polish lookbook coming your way later this week, but I want to share my first manicure of the season with you now. You'll see me go on and on about why I don't generally ascribe to the rules of "seasonal colors" later, so suffice it to say that while I will wear any color I want on my nails regardless of the season, I do like to be inspired by the changes of climate and nature as I dress myself, do my makeup, and paint my nails.

Let's just get to the polish.


Please excuse the minor rubbings at the tips of some of my nails. I had just spent the afternoon at the barn moving fences.
Meet "Foxy" by Revlon. I picked up this shade at a Meijer grocery store. I wish they existed around me because it was basically a store with the relative fanciness of Target and the prices of Wal-Mart. (At least the one I visited.) That's a lot of winning. I grabbed a Revlon polish because I was curious about the inventory and the price of makeup items, and I have to say I was very pleased with both. You are blessed if you live near a Meijer.

I used the usual Orly Bonder Basecoat and Polisheild Top Coat with this manicure. 

"Foxy" is a lovely, deep, purply, brownish sea of rich chocolately goodness in nail polish form...I think.
It makes me think of those barrel-shaped rootbeer flavored candies but with a bit of purple thrown in there. The normal two coats gives a basically flawless finish with completely opaque color, and the polish applies very easily, as most of Revlon's do. In the bottle you can see silver bits of shimmer worked through the color, and that's what helps it give such a high shine. I'm hoping the above picture helps you see how it is very brown and also very purple at the same time.

I highly recommend this polish for all skin tones, no matter the season, but especially in the fall. Thanks for viewing another Manicure Monday! I've got a lot planned for this week, so don't go too far.

Tuesday, September 16, 2014

Two Manicure Tuesday! I owe you one...

Ok, so I owe you more than one. I've got two pretty unrelated manicures for you this evening. One is from some time this summer and the other is what I've got on my nails currently. I don't really know that there is any snazzy way I could introduce these, so, here we go.

The First:


Just in case you want to see it only moderately closer than the image above...
What I Used:
ORLY's Bonder Base Coat
2 coats of e.l.f.'s "Misty Haze"
One the ring finger: 1 coat of Sinful Colors's "Glittery in Pink"

There is actually no top coat on this mani, which you might have been able to tell by the lack of super shine. This was a testing manicure for the power of ORLY's Bonder Base Coat, which has been a somewhat long-time favorite of mine. I like to test my go-to products every once in a while to make sure that they are still performing to the standards I expect, and this time around, I was not disappointed. The nails with "Misty Haze one them stayed essentially chip-free for about five days while I was working in a horse barn bathing large animals, cleaning stalls, riding, and much more. And the accent nail lasted for more like 7 days with NO CHIPS. Glitter always comes through.

Because I believe deeply in the quality of e.l.f. nail polishes (especially the reliable smooth finish of their cream shades), I want to make it really easy for you to try them out. Just click here :).

The Second:

To be entirely honest, it's a bit of a weird one. I think it's growing on my, but I'm still not entirely sure how I feel about this color. Take a look.


What I Used:
ORLY's Bonder Base Coat
2 good coats of Revlon's "Chameleon" (I would suggest two thicker coats or three thin ones)
ORLY's Polishield Top Coat

Honestly, It was really difficult to pick a realistic picture since this polish changes so much depending on the lighting. Sometimes it looks really thick and rich on my nails (usually in sunlight or natural lighting) like in the third picture. Other times (in more fluorescent or indoor lighting) it looks thinner and a little more imperfect. It changes color depending on the lighting and the angle from which I'm viewing it, but generally it is a golden yellow with some green and/or brownish tinges. "Chameleon" is a very interesting color, but I'm not sure it's for everyone. The formula was quite easy to work with, as most Revlon polishes are, and I didn't feel like it was overly streaky, especially considering it is a metallic shade, and those can tend to streak. It does not do much to cover imperfections in my nails such as uneven areas or splits.

There you go. Stay tuned for a beautiful guest star in the next post at Curly Girlie!

Monday, September 1, 2014

Manicure Monday! Hey, I'm Still Around.

So hey everyone. I think this was actually the busiest summer that I have ever experienced. Now that I am back at school, I am super ready to get blogging again since I will have so much more time to devote to it. That's not usually how the world works, but I can dig it.

Here's why I didn't find the time to blog even remotely as much as I wanted.

First, I went to an internship at a stable. I met this cutie pie. His name is Donkey, he is a donkey, and he brought me a lot of joy this summer.


Then my sister got married. She was beautiful. He was beautiful. It was beautiful. I'm still pretty gushy about it.

You can actually see tendrils of love floating between them. Told you it was beautiful.
That's my dad and my sister dancing. I think it's the best.

I managed to take a large wooden board to the eyelid, so makeup was a little out of the question for about a week. I don't have any good pictures of that, sorries :/.

Then I got to see my boyfriend be the best best man ever at another beautiful wedding. Also, had a super time getting ready for that :)

I'm thinking about doing an outfit of the day of sorts for what I wore. What do you think?
Then I got to do this. Actually, I got to do this kind of stuff all summer, but here are some of my favorite moments.


Now that you have the official updates on my life, let's talk about a manicure. I did this one to accent my orange dress for the wedding I attended. I wanted something to pop against the blank canvas of the dress, so I got out the good old color wheel in my brain and choose some greens and a blue. Here's the official list:

As usual, I started with one coat of Orly's Bonder Base Coat.

Then two coats of e.l.f.'s "Teal Blue" on my thumb, ring finger, and pinky. This polish is actually super opaque, and I really could have gotten away with just one coat. Also, it's really not at all blue...

On my index finger is e.l.f.'s "Thunderstorm." This is another super opaque polish. I only used one coat and then topped it with Revlon's "Ritzy," which is a build-able black formula with silver glitter. I didn't want the nail to be straight up black, which is why I used "Thunderstorm" underneath, since that polish has some really deep green tones in it. 

On my middle finger is Wet 'n' Wild's Megalast Polish in "I Need a Refresh-Mint." I would highly suggest picking up this polish if you are looking for a fun and easy blue to wear. It is also very opaque; one good coat and you can be done. 

Not as usual I topped this look with Orly's Polisheild Top Coat. I picked up a different one this time and I am interested to see how it compares to the Orly Won't Chip. So far, I can say that I do like it. 


I have to say that I really like pretty much every nail polish that I have from e.l.f. I order from them every once in awhile when they have really great sales and I usually end up getting a least one nail polish each time. I have to say that I can't think or any off the top of my head by which I have been disappointed. Their cream finish formulas are particularly impressive; I know of a lot of more expensive polishes that can't pull off such opacity and smoothness. You can take a look at their color options here.

Thanks for visiting :) Stick with me.

Tuesday, June 10, 2014

Eyeshadow 101: What to Do.

Here's the thing about eyeshadow (and makeup in general). It is not as if there are magical steps that will always work to produce flawless eye looks. Now, that being said, there are some really basic and useful concepts to get you started. I'd like to share a couple of those with you. My own story with eyeshadow is that I started with really basic looks and colors; I created formulas and I would choose one each day to paint on my lids. Eventually I got more and more confident, so I started trying different products, colors, and techniques for getting my eyes to look the way I wanted. 

My opinion is, after some general tips, you kinda just have to do what you want and what you like. Once you get comfortable working with products, you can have a lot of fun trying new things, or just finding that perfect everyday look for you. Oh, and here's the other thing: you don't have to do it alone. I certainly didn't. I've been watching makeup tutorials, looking at magazines, and reading blogs for several years now. At this point, I've spent enough time doing my own experimenting that I'm ready to create my own place for people to go for help with their makeup. So, without further ado, let's talk eye makeup.

Here are some ideas that I have found to be really helpful when working with eye makeup.

Just a quick note about the links; please-oh-please look for these products in stores first. You can save a lot of money by not buying drugstore products directly from the brand. And save on shipping. So yeah, check the stores.

1. Start with a base/primer.
This means different things for different people. For those with very oily eyelids, a base might be a swipe of a light beige eyeshadow. For those with dry eyelids, it is important to use moisturizer under a base or primer. For the average person, a product actually labelled as an eyeshadow primer is a safe bet, and there are lots of options for lots of different price ranges. It's mostly about finding a product that gives you the results you want. Ideally, we want a primer to keep our shadow from creasing or fading throughout the day. Some can even help shadow look brighter or richer. My preference is to use a light moisturizer over my lids and then follow that with a thin layer of whatever primer I'm using at the time. I like primers that, once spread, still have a slightly tacky feeling. That tackiness really helps your lids grab the eyeshadow off your brush. Bonus: primers can make less expensive eyeshadows look and work like more expensive ones. Although many not so expensive eyeshadows are the bomb regardless of their price point. 

Products to try: e.l.f.'s Essential Eyelid Primer; Wet 'n' Wild's Take On the Day Eyeshadow Primer from the Fergie Collection; NYX's HD Eyeshadow Base

2. WEAR MASCARA.
Even if you have dark brown or black lashes that are long, thick, and luxurious beyond the norm, it is still a good idea to swipe on a coat or two of mascara. As you start to work with darker colors, if that's what you choose to do, you will probably find that eyes just don't look done without mascara; it finishes a look and smokes out everything behind the lashes. Even for lighter looks, I just think mascara adds that finishing touch. As far as color is concerned, I always go for black, and usually the darkest black that a mascara I like can be. Even with blue eyes, fair skin, and light hair, I still believe black mascara is the way to go.

If you don't have lashes with which you are happy, even with mascara, then false eyelashes might be something to consider, but that's a topic for another time.

Products to try: L'Oreal Voluminous Original Mascara (and the Voluminous Full Definition and Voluminous Carbon Black); L'Oreal Telescopic Mascaras; mostly just anything from L'Oreal

3. Don't leave your eyes hanging.
You know how it feels when you raise your hand for a high-five or a fistbump, or when you smile across the party at a friend and they just have no idea you're looking for some acknowledgement? I do, at least. That's how your eyes feel when you're rocking some great liner and mascara and maybe even a little smokey eye, but you have nothing on your face. Unless you have a just dazzling complexion, a little concealer, powder, and blush (at the minimum, the face has just as many fun options as the eyes) can go a long way toward helping you have a finished look. And even though it may seem scary or frustrating to think that to get eye makeup figured out you've got to get some face makeup figured out too, I think that working with both will ultimately give you looks about which you are a lot happier. 

And don't worry, I'm going to have many more posts about how I actually do all these things I'm talking about :)

4. Blend blend blend. Then blend some more.
If you are already working with glittery greens, deep blues, bright oranges, and whatever else you feel like, but still aren't happy with how your eyes are turning out, check your blending. I usually keep a nice fluffy round eyeshadow brush clean of product and use it just to blend edges on my lid. Although aquamarine will probably never be considered a "natural" color, there are ways to help it work into the rest of your face. At the top of that list of ways is BLENDING. And even if you are working with only light browns, if you aren't blending, you're probably ending up with looks that aren't as flattering as they could be.

If you haven't yet delved into the world of eyeshadow but want to, keep blending in the front of your mind as a very important part of eye makeup.


There are four tips to get you started. I've got so much more I want to share with you about eyeshadow, but I wasn't sure how to condense a lot of it, so stick around for some more detailed posts about specific eye looks and makeup. The next Eyeshadow 101 topic will be...BRUSHES. Thanks for visiting.

Monday, June 9, 2014

e.l.f. cosmetics Studio Geometric Eyeshadow Review VIDEO!

Today is a very exciting day. I'm sure it is so for multiple reasons, but the one I'm thinking of is the fact that there is now a little video swimming around YouTube that I filmed, edited, and posted for you.

It's the first of what I hope will be many opportunities for me to share with you what I'm thinking about and doing with makeup. Check it out down below.


I'm sorry it's a little long and a little boring and a little disorganized. But I'm pretty proud of myself and how brave I am being by posting it, so all that stuff doesn't really concern me at this point. I had to cut it short of my "Thanks for watching. Have a great day" because the sound got very weird at the end.

I hope you take some time to watch it :) I would really appreciate that.

Here are links to the two palettes I review:
96-Piece Geometric Eyeshadow Palette
150-Piece Geometric Eyeshadow Palette

Have lovely days.

Tuesday, May 27, 2014

Two Manicure Tuesday!

So recently I have had many computer problems and scheduling problems and time management problems and just haven't been able to get the posts up that I want to. It's sad, really, but there are bigger things.

To make up for it a little bit, I'm giving you two manicures for the price of one. But not really, since reading this page doesn't actually cost anything.

Here we go!


I mean I think I am probably the star of nail art right about now. Except not so much. I won't even show you the heart on my right hand. It was a struggle.

I had several polishes that I wanted to test out, so I figured I would just put them all together and get that job done. 

Here's what's going on:
Orly's Bonder Base Coat.
The medium purple is Funky Fingers's "Violet's Vineyard."
The light pink is L'Oreal's "Penthouse Pink." I used that on the accent nail and as the color for the dots on my thumb and the heart on my pinkie.
The light pink sparkle (sorry you can't quite get the true effect of the color) is Sinful Colors's "Glittery in Pink." It's an icy pink in natural light, and almost looks rose goldish in artificial light. Unfortunately it was part of a holiday collection, so I don't know if you'll be able to find it if you want to try it out.
The darker sparkle coat on my ring finger is Sally Hansen's Complete Salon Manicure Sequin Overcoat in "Cheery on Top." It's a polish of different size glitters in pinks, blues, and purples. 
And on top, Orly's Won't Chip Top Coat.

Full Disclosure Time: Combined, "Violet's Vineyard" and "Glittery in Pink" did not do so hot. Each polish has a good formula that is easy to apply and  lasts for awhile on its own and with other color combinations I've tried, but these two polishes together peeled off within just two or three days :(

I used the smaller end of a dotting tool to do the dots on my thumb and the larger end to make the heart on my pinkie. It's amazing how unsteady one's hands become as soon as one desires to participate in the nail art frenzy of our time. 

On to the next one...

I have to say that I am something even more than excited to share this manicure with you. You might say I am beyondstokedfantabulouslyinterestedoutofmyownsmallworldreadyand justplainhappy to be sharing this nail polish with you. 

It's by Orly. It's called Bubbly Bombshell. And it is one of my favorites. Ever.

I mean, just look at it.

In the bottle it just looks like another clear base with a pretty decent fuchsia glitter. I bought it on a bit of a whim, hoping it wouldn't turn out to be too sheer and just another glitter. I was not at all disappointed. Turns out in two coats this polish is an absolute opaque masterpiece of glistening pinks and purples. Boom.

Underneath I used Orly's Bonder Base Coat and on top is Orly's Won't Chip Top Coat. That probably goes without saying.


This is what the camera picked up under indoor lighting. It actually looks much more pink in person.

Thanks for sticking with it. See you again soon.